Lightning Components – Dreamforce 2015 minihack lessons learned

trailhead_module_lightning_components

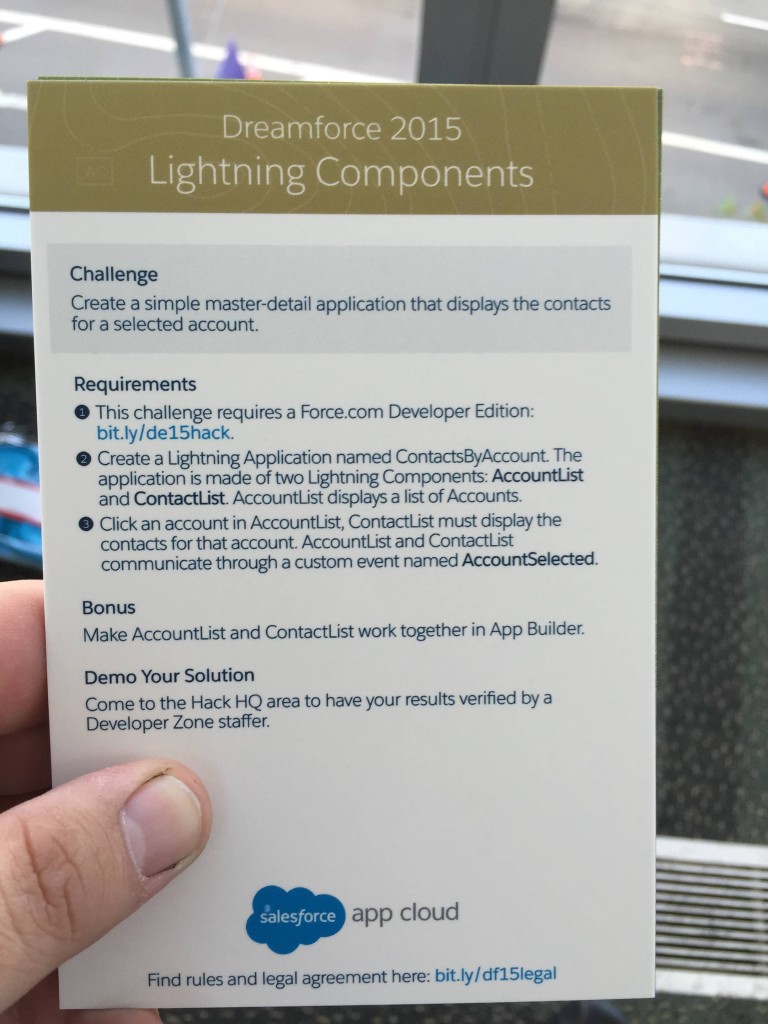
While at Dreamforce this year I spent a good amount of time focusing on the minihacks in the DevZone. I managed to complete all seven of the challenges, but also became somewhat of the local Lightning Components expert in the challenge area while helping a friend of mine on that challenge.

It was tons of fun helping other developers out and seeing how differently developers think about the implementation, and learning more about Lightning Components in the process. I gained more than I expected by helping others though; when I completed my challenge the first day, I failed to notice that all my accounts returned the same contact. I only discovered the issue in my code while helping others to solve the challenge.

Dreamforce 2015 Minihack - Lightning Components

Dreamforce 2015 Minihack – Lightning Components

The problem:

You can pass null variables from client-side controllers to server-side controllers. More specifically, I was passing data from my component to my client-side controller wrong, and as a result sending a null value to my server-side controller in Apex. In a developer edition org with basic data, this would normally be obvious when no contacts were returned, but for some reason I had tested with contacts that have no account in my dev org.

So how do we properly send data from component to its client-side controller? Here are the different options I found when working to resolve the issue.

Option 1: Passing via a data- attribute on a standard HTML tag

In the component you pass a data- attribute to carry the data on the event triggering element where you can grab it in the client-side controller. I noticed this method didn’t work with standard components of aura like ui:button (it rejected HTML5 data- attributes on save). I’m using an anchor tag instead, and attaching it to the data-accountid attribute.


<aura:component controller="AccountListUtil" implements="flexipage:availableForAllPageTypes">
	<aura:attribute name="accountList" type="Account[]"/>
	<aura:registerEvent name="AccountSelected" type="ds23:AccountSelected"/>
	<aura:handler name="init" value="{!this}" action="{!c.doInit}"/>

	<ul>
		<aura:iteration items="{!v.accountList}" var="acc">
			<li>
				<a href="" data-accountid="{!acc.Id}" onclick="{!c.handleAccountSelected}">{!acc.Name}</a>
			</li>
		</aura:iteration>
	</ul>


</aura:component>

Once inside the onclick event handler in the component’s client-side controller, we can grab the element from the event parameter with event.target. From here we have the element and can use standard Javascript methods to manipulate or inspect the element. Because HTML5 data attributes start with data-, and Javascript rightfully sees “-” as a minus operator, we have to grab the attribute with the .getAttribute method.


({
	handleAccountSelected : function(component, event, helper) {
		var accountId = event.target.getAttribute('data-accountid');

		var appEvent = $A.get("e.ds23:AccountSelected");
		appEvent.setParams({ "accountId": accountId });
		appEvent.fire();
	},
		doInit: function(component, event, helper) {
		helper.getAccountList(component);
	}
})


Option 2: Passing data with another component and aura:attribute

This is the option I chose when fixing my entry, and the reason I chose it was to keep my application modular. I’ve been developing in Meteor for some time now, and as a result, I tend to write components more often than before (Meteor is heavily component based). I like this solution for re-usability, but both solutions work well from my experiences.


<aura:component controller="AccountListUtil" implements="flexipage:availableForAllPageTypes">
	<aura:attribute name="accountList" type="Account[]"/>
	<aura:registerEvent name="AccountSelected" type="ds23:AccountSelected"/>
	<aura:handler name="init" value="{!this}" action="{!c.doInit}"/>

	<ul>
		<aura:iteration items="{!v.accountList}" var="acc">
			<li>
				<c:AccountView accountId="{!acc.Id}" name="{!acc.Name}"/>
			</li>
		</aura:iteration>
	</ul>
</aura:component>


The main account list component passes the account’s Id and Name fields into a second component that has aura:attributes setup to receive each. The account view component then uses those attributes to display the data. Note: You could pass in an entire Account SObject instead and have this component do much more.


<aura:component >
	<aura:attribute name="accountId" type="Id"/>
	<aura:attribute name="name" type="String"/>

	<ui:outputText value="{!v.name}" click="{!c.handleAccountSelected}"/>
</aura:component>


On the element of the component that displays the account name, I setup a click handler to process when someone clicked on an account. In the account view’s client-side controller we can now access the attributes containing the account’s Id and Name with the component.get method using the “v.[ATTRIBUTENAME]” parameter.


({ 
	handleAccountSelected : function(component, event, helper) {
		var accountId = component.get("v.accountId");

		var appEvent = $A.get("e.ds23:AccountSelected");
		appEvent.setParams({ "accountId": accountId });
		appEvent.fire();
	}
})


Summary

With both methods we end up with an accountId variable in the client-side controller.  Once we have that attribute value, we just need to wire up the rest of the challenge and send the event message to the other components (another post, another day).

If you didn’t get a chance to try these challenges out during Dreamforce 2015, I posted the challenge cards to Imgur for later reference.  Definitely check out the minihacks at the DevZone next year, it took me a bit of time, but the real world examples and hands on time were worth every second.

dateConvert Component

Someone recently was trying to resolve a problem of changing the timezone on a date field for use within a VisualForce email template. I threw together this quick component that can change the timezone as well as the format. There is a brief demo VisualForce page below I used on Account to view the created date. I’ll update the post later with some more detailed instructions on how to install this into your org for non developer types. And I will write some test code since you’ll need it to move this to production, but first I’m going to go celebrate my birthday.

dateConvert.component

<apex:component access="global" selfClosing="true" controller="dateConvert">
    <apex:attribute name="format" assignTo="{!dateFormat}" access="global" type="String" default="M/d/yyyy h:mm a" description="Format of the datetime field"/>
    <apex:attribute name="field" assignTo="{!dateField}" access="global" type="DateTime" required="true" description="Field to convert"/>
    <apex:attribute name="timezone" assignTo="{!dateTimezone}" access="global" type="String" default="GMT" description="Timezone to convert to"/>
    
    <apex:outputText value="{!output}"/>
</apex:component>

dateConvert.cls

public class dateConvert {
    public String dateTimeZone {
        get;
        set;
    }
    public DateTime dateField {
        get;
        set;
    }
    public String output {
        get {
            return dateField.format(this.dateFormat, this.dateTimeZone);
        }
    }
    public String dateFormat {
        get;
        set;
    }
}

Example usage in a VisualForce page

<apex:page standardController="Account">
    <apex:pageBlock >
        <apex:pageBlockSection >
            <apex:pageBlockSectionItem >
                <c:dateConvert field="{!Account.CreatedDate}" timezone="America/Chicago"/><br/>
            </apex:pageBlockSectionItem>
            <apex:outputField value="{!Account.CreatedDate}"/>
        </apex:pageBlockSection>
    </apex:pageBlock>
</apex:page>

Removing Chatter feed from the home page

Update: This method no longer works due to changes in Salesforce Home Page Components.


Holy cow I’m actually alive, although I can’t say the same for my blog. I finally decided to put something up here on the blog again to help a fellow force.com user. This code can be applied to your home page via an HTML home page component to remove the Chatter feed at the top of the page.

Note Don’t forget to hit “show html” before pasting the code into the component.

<script src="https://ajax.googleapis.com/ajax/libs/jquery/1.5.1/jquery.js" type="text/javascript"></script>
<script type="text/javascript">
$j = jQuery.noConflict();
$j('.chatterfeedshell').parent().remove();
</script>

Once you’ve created the component add it onto the home page layout and it’ll hide the content. The only downside I see so far is it created an additional section in the home page. If you already have an existing HTML component you can just paste this code into it to hide this additional section.

Hopefully I’ll be able to turn this post into a momentum and start posting some more. I’ll refine this post some more later tonight with some images and steps and possibly a non jQuery solution for anyone still living in the dark ages.

Chaining executions with actionFunction

A problem was posed recently for another developer in the forcedotcom community where he was running out of http callouts while trying to use a REST API service. I figured this is the perfect reason to take a break and post a new blog post.

One solution I’ve used in the past to get around issues like this when working in VisualForce is to chain actions together. This solution uses actionFunction with names that are set in the controller. If after the rerender the string is not null the oncomplete javascript will kick off the next action in turn giving another 10 callouts if necessary. I tend to use this solution frequently with slight modifications between booleans to call the same action.

One example of this is calling a web service that has a timeout set. You can chain the action to a boolean in the oncomplete which will start the action again until you stop it with the boolean, usually after 3 or so tries.

I’m still a newbie to WordPress so I’m getting used to the code highlighting plugins. SyntaxHighlighter takes issue with my xml have self closing tags, so just know the actionfunctions and commandbutton don’t require a specific closing tag like that, it can use the standard /> closing tag. This doesn’t apply anymore, code highlighting was fixed finally

ChainedActionController.cls

public class ChainedActionController {
    public ChainedActionController() { }
    
    private Integer chainMax = 5;
    private Integer chainCount = 0;
    
    
    public String outputText {
        get {
            if(outputText == null) outputText = '';
            return outputText;
        }
        set;
    }
    
    public String chainedActionFunction {
        get {
            if(chainedActionFunction == null) chainedActionFunction = '';
            return chainedActionFunction;
        }
        set;
    }
    
    public void actionOne() {
        this.outputText = 'actionOne set this text';
        
        // set the next chain if we haven't exceeded the defined max count
        if(chainCount++ < chainMax) {
            this.chainedActionFunction = 'actionTwo';
        } else { 
            this.chainedActionFunction = '';
        }
    }
    
    public void actionTwo() {    
        this.outputText = 'actionTwo set this text';
        
        // this could also be done with booleans depending on your use case
        if(chainCount++ < chainMax) {
            this.chainedActionFunction = 'actionOne';
        } else { 
            this.chainedActionFunction = '';
        }
    }
    
}

ChainedActionExample.page

<apex:page controller="ChainedActionController">
    <apex:form id="inputForm">
        <div style="border: 1px solid #777; background-color: #efefef; color: #444; padding: 5px;">
             output: {!outputText}
        </div>        
        <br/><br/>
        Status:
        <apex:actionStatus id="actOne">
            <apex:facet name="start">
                Action one is running!
            </apex:facet>
        </apex:actionStatus>
        <apex:actionStatus id="actTwo">
            <apex:facet name="start">
                Action one is running!
            </apex:facet>
        </apex:actionStatus>
        <br/><br/>
        <apex:actionFunction status="actOne" name="actionOne" action="{!actionOne}" rerender="inputForm" oncomplete="if('{!chainedActionFunction}' != '') eval('{!chainedActionFunction}();')" />
        <apex:actionFunction status="actTwo" name="actionTwo" action="{!actionTwo}" rerender="inputForm" oncomplete="if({!chainedActionFunction}) eval('{!chainedActionFunction}();')"/>
        <apex:commandButton status="actOne" action="{!actionOne}" rerender="inputForm" oncomplete="if({!chainedActionFunction}) eval('{!chainedActionFunction}();')" value="Start"/>
    </apex:form>
</apex:page>

Converting string to decimal character array in Apex

Recently I had to find a way to convert strings into their ascii decimal value. I solved this by converting to hex first, and then using some simple math to get the decimal value of each character. This won’t work on double byte characters, but that wasn’t my use case so for now this will work for me.

Edit: After some thinking, making this double byte or even multiple byte wouldn’t be too hard if you were to figure out the ratio of input length to hex output length, then increase the formula to increase the power of 16. I’ll try to get back to this later this week and update for those using multi byte characters.

Edit2: After more investigation and learning the ins and outs of UTF8 I now fully understand the return values of the EncodingUtil.convertToHex method. It returns bytes in UTF8 format. Each byte explains how many bytes that character uses. Some bytes use 1 (old school ascii compatible 0-127), some use 2, 3 or even 4. The range in the first byte tells a story about that character. I have a method to convert these to decimals that can be parsed by String.fromCharArray if anyone is interested. So since each byte is encoded in this, this technically handles UTF8 just fine, and works perfect for my apex ported AES encryption :-)

private static Map<String,Integer> hexMap = new Map<String,Integer>();
static {
	hexMap.put('0',0);
	hexMap.put('1',1);
	hexMap.put('2',2);
	hexMap.put('3',3);
	hexMap.put('4',4);
	hexMap.put('5',5);
	hexMap.put('6',6);
	hexMap.put('7',7);
	hexMap.put('8',8);
	hexMap.put('9',9);
	hexMap.put('A',10);
	hexMap.put('B',11);
	hexMap.put('C',12);
	hexMap.put('D',13);
	hexMap.put('E',14);
	hexMap.put('F',15);
	hexMap.put('a',10);
	hexMap.put('b',11);
	hexMap.put('c',12);
	hexMap.put('d',13);
	hexMap.put('e',14);
	hexMap.put('f',15);
}

public static List<Integer> stringToInt(String input) {
	String hex = EncodingUtil.convertToHex(Blob.valueOf(input));
	List<Integer> retValues = new List<Integer>();

	for(Integer i=0;i<hex.length();i+=2) {
		retValues.add( (hexMap.get(hex.substring(i,i+1))*16) + (hexMap.get(hex.substring(i+1,i+2))) );
	}
	return retValues;
}